Overview
One of the most awaited and interesting features of WMF 5 DSC is Partial Configuration. Until WMF 5 DSC, it was difficult to split large configuration into multiple smaller configurations. Partial Configuration enables us to split configuration into multiple smaller configuration fragments across multiple files. Partial configurations are implemented exactly the same way as any general DSC configuration. It is the responsibility of LCM on a target server to combine all the configuration fragments into a single configuration and apply it.
The configuration fragments and files doesn’t indicate in any way the existence of Partial Configuration. Each Partial Configurations is complete in itself and can be applied independently as a configuration to any server. Partial Configuration are deployed on pull server following a sequence of steps and the target node LCM is configured to download these partial configurations, combine them and apply it on the host. The magic of Partial Configuration is conducted by the LCM.
Partial Configurations works with DSC Pull, push as well as Mixed mode. In this blog we will delve deeper into the realms of partial configuration in pull mode. It means that LCM of servers in a network should be configured to pull configurations from Pull Server (web server or SMB Share) and it should be able to identify the configurations distinctly on these pull servers.
All preview releases of WMF 5 had partial configurations available as a feature but they worked using one of the properties of LCM known as ConfigurationID whose value is a GUID. With the RTM release, Partial configurations works with ConfigurationID but at the same time it also works when ConfigurationID is not provided. This is a huge leap from previous releases as now there is no need to remember Configuration IDs as part of DSC Configuration names. Now, the configurations can be referred just by their name. It is much more natural and easier to use and manage.
Benefits of Partial Configuration
Some of the benefits of Partial Configurations are
- Multiple authors can author configurations independently and simultaneously for servers in a network.
- Incremental configurations can be applied to servers without modifying any existing configurations.
- Modular authoring of configurations.
- Removed dependencies on single MOF file. This was the case in DSC v1 where only one MOF file was allowed and applied to a server at a given point of time. Newer configuration (MOF) would replace the current configuration in DSC v1.
Steps for using Partial Configuration
For making Partial Configuration work in technical preview, following steps should be performed.
- Creation of Pull Server
- Configuring LCM MetaConfiguration of servers in the network.
- Authoring Configurations
- Deploying Configurations on the pull server.
We will not go into details of creating a pull server. I would be covering that in a separate blog. We will assume that pull servers are already deployed and configured for the purpose of this blog.
There can be more than one pull server within an enterprise and so to make the example shown in this blog more realistic would assume that there are two pull servers. The names of the pull server are marapwkvm0 and SQLWitness0. The name of the target node which will pull partial configurations from these two server is marapdovm. We also have two configurations each deployed to one of the pull servers. The LCM of a target machine (marapdovm) will be configured with these two pull servers and configurations.
LCM Configuration
Let’s now focus towards configuring a server’s LCM Configuration. Specifically, we need to configure
- RefreshMode with value of “Pull”
- Optionally but desirable ConfigurationMode value to “ApplyandAutoCorrect” to keep the server in expected state. Also, from blog perspective, we will be able to see something tangible.
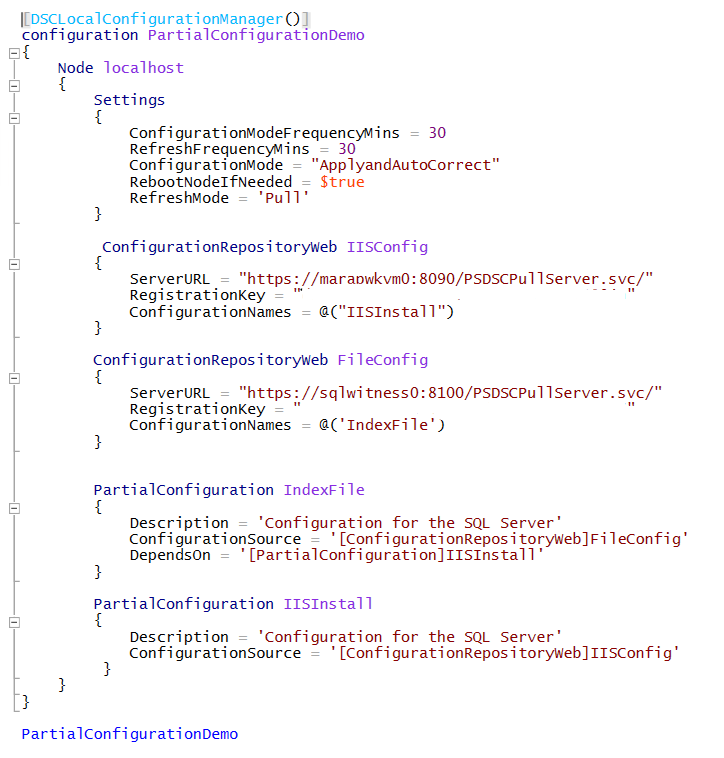
- RefreshMode is set to Pull mode within the settings block. This will make all partial configuration use pull mode.
- Multiple ConfigurationRepositoryWeb resource instances each representing a pull server. The url of the pull server on marapwkvm0 is https://marapwkvm0:8090/PSDSCPullServer.svc/ running on port 8090. The url of the pull server on SQLWitness0 is https://sqlwitness0:8100/PSDSCPullServer.svc/ and it is running on port 8100.
- Each pull server is configured with a RegistrationKey. This is a shared key between the target node and pull server. The RegistrationKey for respective pull servers should be provided within this block. It has been whitened out due to security reasons. You should put your own RegistrationKey for these values.
- ConfigurationNames is a new property added to ConfigurationRepositoryWeb. This property determines the configurations that should be downloaded and applied on the target node. It is an array property and can contain multiple configuration names. The names should match exactly to the deployed configuration.
- Multiple PartialConfiguration resource instances each representing a configuration on a pull server. On pull server marapwkvm0, a configuration named “IISInstall” is deployed whose whole purpose is to install IIS while on pull server SQLWitness0 another configuration named “IndexFile” is deployed whose purpose is to generate a .htm file with some content. The names of the partial configuration should match the configurations available on the pull server as well as the names provided as values to “ConfigurationNames” property of ConfigurationRepositoryWeb.
The entire code for LCM configuration is shown here. This code should be run on target node. In our case it is marapdovm.
The above code should be executed only after the partial configurations are authored and deployed on the respective pull servers.
Just to ensure repeating it again. PartialConfiguration block defines configuration fragments. Two partial configurations “IISInstall” and “IndexFile” are defined. “IISInstall” configuration is available on IISConfig pull server while “IndexFile” configuration is available on FileConfig pull server. Important to note are the names of the partial configurations because they should match exactly with the names of the configurations on pull server. You will see next that “IISInstall” configuration is authored and available on PullServer1 and “IndexFile” configuration is available on PullServer2. “ConfigurationSource” property attaches the Pull Server to the partial configuration.
IISInstall Configuration
This is a simple configuration responsible for installing IIS (Web-Server) on a server using WindowsFeature resource. Execution of the configuration would result in generation of MOF file. A corresponding checksum file is also generated for the mof file. Both the files – mof and checksum is copied over to the ConfigurationPath folder which in my case is “C:\Program Files\WindowsPowershell\DSCservice\Configuration”. The configuration uses localhost as node name however while copying the files, they are renamed same as the configuration name.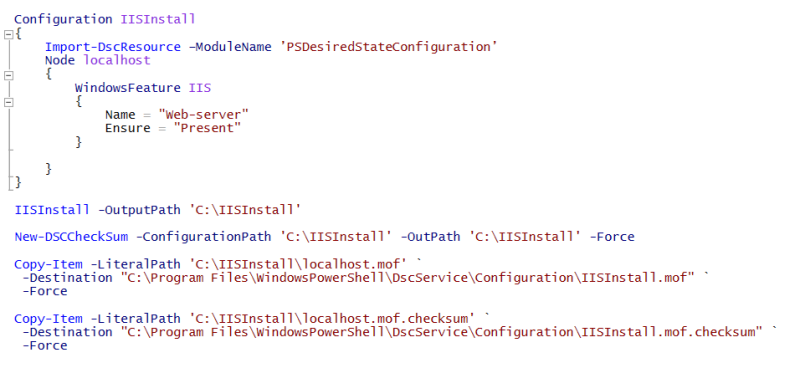
New-DSCChecksum command is responsible for generating the checksum for the configuration mof file. Both IISInstall.mof and IISInstall.mof.checksum should be available now at “C:\Program Files\WindowsPowershell\DSCservice\Configuration” folder on marapwkvm0 server.
IndexFile Configuration
This is again a simple configuration responsible for creating a .htm file at C:\inetpub\wwwroot folder on server using WindowsFeature resource. Execution of the configuration would result in generation of MOF file. A corresponding checksum file is also generated for the mof file. Both the files – mof and checksum is copied over to the ConfigurationPath folder which in my case is “C:\Program Files\WindowsPowershell\DSCservice\Configuration. The configuration uses localhost as node name however while copying the files, they are renamed same as the configuration name.
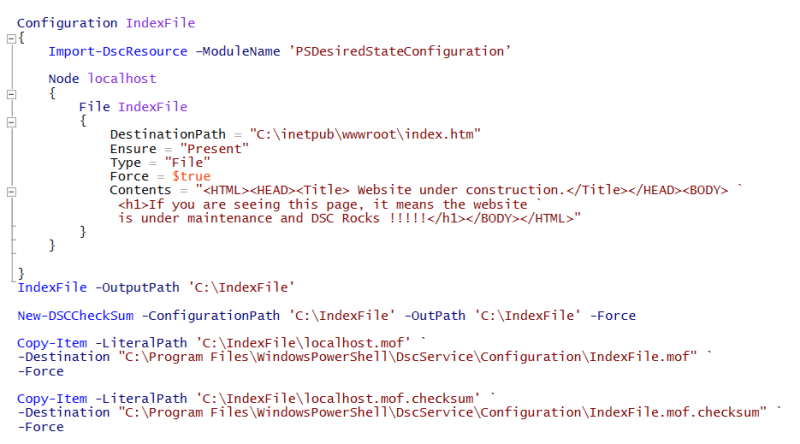
Both IndexFile.mof and IndexFile.mof.checksum should be available now at “C:\Program Files\WindowsPowershell\DSCservice\Configuration” folder on SQLWitness0 server.
Now, it time to move to the target node and apply the LCM configuration that we authored earlier.
Execute the below command to apply the configuration related to LCM on the target node.
Set-DscLocalConfigurationManager -path “C:\PartialConfigurationDemo” -Force -Verbose.
Below is the output we should be able to see

After the LCM configuration is modified for making partial configurations work, it’s time to apply the configuration by asking LCM to pull the configuration from pull servers.
Execute the below command to pull, store and combine the configurations on the target node.
Update-DscConfiguration -wait -Verbose
Below is the output we should see

The above command will download the configurations, combine them and put them into pending state. It will not apply immediately. When the LCM is invoked again depending on the value of ConfigurationModeFrequencyMins, the configuration will be applied based on the value of ConfigurationMode. In our case, it will apply the configuration and also auto correct it.
To execute the configuration immediately, run the following command
Start-DscConfiguration -UseExisting -Wait -Force -Verbose
Below is the output we should see
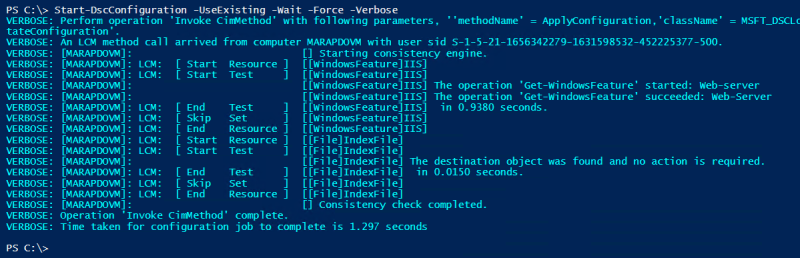
VOILA!!! You can see that both the configuration containing their resource (IIS and IndexFile) are applied to the server.
We have applied partial configurations to a node by referring to the configurations by their names instead of using ConfigurationID GUIDs.
This is just the tip of the beginning and stay tuned for more detailed information.
If you like this post please share and if you have any feedback please share that too.
In next post will get in deeper with more Partial Configuration on WMF 5 RTM.
Cheers!!